Comfort Sundays

IMG_7748

Cheese is comfort right?

If you know me, you’ll know I keep a list a mile long. There just isn’t enough time to do, see, and cook everything! I have a hard time slowing down, a hard time focusing on just one thing, and a hard time not feeling like I’m missing out on something else. Until I suddenly slam to a stop because I’ve overdone it, and then nothing gets done, we eat popcorn, and my list (not being checked off during said down time) grows ever longer.

So in an effort to find some more balance and to feel like I’m being creative and cooking, I’ve decided to instigate Comfort Sundays. This involves (mostly) us picking and making a from-scratch, home-cooked real dinner on Sundays. These meals can be a more more fancy, a bit more labour intensive and will (hopefully) lead to trying out some new recipes (and a feeling of accomplishment.)

IMG_7739

This potato gratin kicked off Comfort Sundays. It was something I had bookmarked a while ago, but hadn’t had time to make. I was attracted to the recipe because it promised scalloped potatoes with less effort!

It did not disappoint! In fact, it may have stolen the show right out from under the nose of the ribs that we made to go it…. Now that’s something!

It is SO easy to make. It doesn’t need too many ingredients and things can definitely be swapped in and out. I read that you could swap in celery root, sweet potatoes, or butternut squash for half the taters. We didn’t. But I would when I make it again!

Rub ‘er down with butter and garlic

Layered and sprinkled

IMG_7743

Drenched and filled

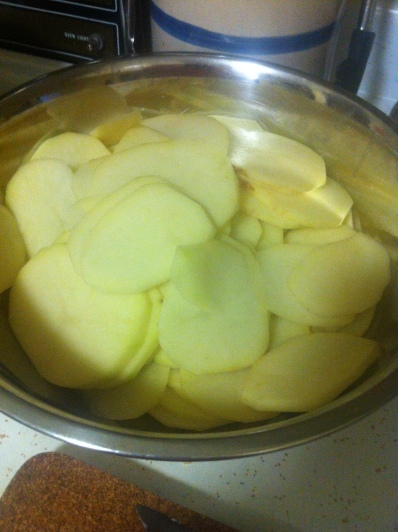
So… You cut your potatoes thinly (You could use a mandolin but I’ve yet to be converted to wanting to drag out an appliance I don’t fully understand AND will need to wash. A sharp knife did just fine). Butter your dish. Layer your potatoes overlapping them. After each layer, add salt, pepper, nutmeg and thyme. I had enough for three (four?? I can’t remember…) layers. Then add equal parts stock (I used chicken, you can use any kind), and heavy cream. Top with cheese and bits of butter. Bake. Eat. Moan.

IMG_7744

Grate some great cheese

IMG_7745

Assembled and ready to bake

Cheery Cheesy Potato Gratin
Recipe via Alexandra’s Kitchen and originally Chez Panisse Vegetables (A book I’m adding to my wishlist!)

You really can’t mess this up. I promise. As long as you have potatoes and enough liquid to cook them and cheese to top them and make them broily and bubbly and CHEESY, you’ll have dinner in 1.5 hrs. I love that this (to me…) delivers scalloped potatoes with half the fuss. Happy Eating!

Ingredients: 

  • unsalted butter
  • 1 crushed garlic clove
  • 3 lbs. peeled potatoes (I used yellow potatoes)
  • salt and pepper
  • fresh thyme sprigs (leaves picked off)
  • nutmeg*
  • 1.5 cups (roughly) stock
  • 1.5 cups (roughly) heavy cream
  • 1 heaping cup grated Gruyere (or Swiss, or Comte) cheese
  • 1/4 cup grated Parmesan cheese

*After discovering that you could grate. nutmeg. fresh. every. time. with just a microplane, I’ve never looked back. But use what you have!

Method:

  • Slice potatoes thinly
  • Butter your dish and rub a crushed garlic clove all around. If you love garlic, you can just leave the bits at the bottom of the pan.
  • Put a layer of potatoes down, overlapping them.
  • Sprinkle with salt, pepper, thyme and nutmeg.
  • Repeat layers, until all the potatoes are used up.
  • Pour in equal parts stock and heavy cream. It should come up to the top of the potatoes.
  • Sprinkle the top with your cheeses and dot with butter. (The dotting is optional)
  • Bake at 425ºF for 45 to 60 minutes. If the potatoes appear to brown too quickly at 40 minutes, cover them with foil and keep baking until they’re tender all the way through.

 

Ballin’ retro

The cheese ball is back!

The cheese ball is back!

I know what’s been in missing in your life. At every party you’ve gone too. You’ve stared at the cut-up veggies, cubed cheese, ranch dip…. and sighed. Every time, you scan that table one more time, secretly hoping that something better might appear.

Ok, so maybe you aren’t dreaming about cheese balls. Maybe you lived through the last cheese ball phase, and you’re so.over.them.

Hear me out… this is Cheeseball 2.0. Not your mama’s cheeseball. It’s been updated with fresh herbs, roasted spices, and rolled in toasted nuts, seeds, or herbs.

toasting fennel

Toasty fennel

I took this to a birthday party and judging by the remnants, it was a hit.

I made 2 different ones out of a copy of Bon Appetit. (And is it just me, or does the magazine inspire you as much as it overwhlems you? So many dishes! So many beautiful pictures! So few hours and so few parties to bring it all too!)

capers, zest, fennel seeds, cream cheese

Pre-Whirl: capers, zest, fennel seeds, cream cheese, oregano

I digress. (Although I will digress further by saying that when you only live with the two of you, it’s hard to eat all you want to make. I still have frozen pie dough waiting for just the right time to make that cherry pie. Time for a dinner party!)

Right, back to the cheeseball.

Feta Cheeseball with Pine Nuts
Recipe via Bon Appetit

This guy is easy to make. Just whirl everything together and scrape into a bowl. Pay attention to the ounces. It’s easy to accidentally double the cream cheese. Not that I would know.

Also, for both these balls…. go easy on the salt. The feta is already salty and the accidental doubling actually helped it be less so.

Ingredients: 

  • 4 ounces cream cheese, room temperature
  • 4 ounces feta, crumbled, room temperature
  • 2 tablespoons unsalted butter, room temperature
  • 2 tablespoons capers
  • 2 tablespoons fresh oregano leaves
  • 2 teaspoons fennel seeds, toasted
  • 1 teaspoon finely grated lemon zest
  • salt*
  • 1/2 cup pine nuts, toasted and chopped

*I use a variety of sea salts. Usually Himalayan pink salt, but also grey salt from France and flaky Maldon. They all vary in saltiness levels. Adapt  to taste, depending on what’s in your cupboards.

Method:

  • Process cream cheese, feta, and butter in a food processor until smooth.
  • Add capers, oregano, fennel seeds, and lemon zest; pulse until combined, season to taste with salt.
  • Line a small bowl with plastic wrap, and scrape mixture into it with a spatula.
  • Gather up plastic around cheese, forming into a ball.
  • Refrigerate to firm up. (3-12 hours is suggested)
  • When ready to serve, unwrap cheese ball and roll in pine nuts.


Delicious delicious bacon

Delicious delicious bacon from Roast Butcher

Seeded Cheddar Cheese Ball
Recipe ever so slightly adapted from Bon Appetit

The original recipe called for a couple strips of pancetta, cooked and chopped up. It can be left out. I cooked some bacon instead, before realizing there would be veg-heads at the party, so I left it out of the recipe. It wasn’t missed.  Then I made a bacon sandwich to dispose of the evidence.

The original also called for sliced garlic and shallots to be fried up and mixed with the seeds prior to rolling the ball in it. Since I was bringing these to a party, I thought I would fry everything there. I didn’t. It was still delicious.

Ingredients:

  • 1⅓ cups grated  cheddar cheese
  • 4 ounces cream cheese, room temperature
  • 2 tablespoons unsalted butter, room temperature
  • 1 green onion, thinly sliced
  • 2 teaspoons  black pepper
  • 2 teaspoons Worcestershire sauce
  • salt to taste
  • 1 teaspoon poppy seed
  • 1 teaspoon sesame seeds, toasted

 Method:

  • Process cream cheese, cheddar, and butter in a food processor until smooth.
  • Add green onion, black pepper, Worcestershire.
  • Pulse until combined, season to taste with salt.
  • Line a small bowl with plastic wrap, and scrape mixture into it with a spatula.
  • Gather up plastic around cheese, forming into a ball.
  • Refrigerate to firm up. (3-12 hours is suggested)
  • When ready to serve, unwrap cheese ball and roll in a mixture of sesame and poppy seeds.


Truffle This

Truffle this

Goes well with your (boozy?) coffee

I have a confession. I’ve been drinking Bailey’s in my coffee for the better part of a week now. Really, it all began over a month ago, the morning of the wedding, when we figured we would need something to fortify ourselves with.  After a brief pause (let’s not kid ourselves… filled with Mexican beers, pina coladas, and margaritas, lest you think any kind of cleanse was happening), I couldn’t WAIT to get my hands on the Baileys again. ‘Tis the season, right?

I know it’s almost time to put away the sugar, step away from the butter, and re-learn how exactly to shred kale again. But until then… just one more sip?

The gathering

The gathering

These boozy little bites go perfectly with your coffee, your tea, or that mid-afternoon bottle of red you cracked open. They come together quickly and the payoff is huge!

melting chocolate and hot cream

You heat up some heavy cream (I used whipping cream), break up your chocolate and pour the hot cream over it. You’ll likely need to use a double boiler (a pan of water with an inch or two of water simmering in it on which you’ll set your metal bowl) to melt it all down into a thick chocolaty concoction.

Double boiler

Double boiler

Then you stir in the other ingredients, dump into a pan and cool in the fridge for 30 min or so until it is scoopable but not hard. I made it harder on myself by leaving it there overnight and then had to let it soften on the counter until it was the right consistency again.

scooping and rolling

scooping and rolling

It didn’t come out of the scoop cleanly for me and I ended up having to use a melon baller for the size, a spoon to get it out of the baller and then my hands to roll them into round balls. It was a workaround that worked!

Drop in icing sugar (or cocoa, or shaved coconut, or anything you could dream up… finely chopped nuts might be tasty too) and voila! The hard part is trying to savour just one.

production line

Boozy Bites (aka Grand Marnier truffles)
Recipe via Alexandra’s Kitchen

This originally called for the mixture to be cooled in a pan that had been lined with parchment. I used my silicone brownie pan (8×8) and didn’t line it. I likely wouldn’t have lined a glass pan either. I like to live on the edge.

Ingredients:

  • 12 oz. bittersweet chocolate*
  • 1/2 cup whipping cream
  • 2 tablespoons Grand Marnier
  • 1 tsp vanilla extract
  • a pinch of flaky salt
  • powered sugar (or cocoa. or coconut. or nuts.)

* or… 7 oz. bittersweet and then a guesstimated 5 oz. of unsweetened because you didn’t read how much that one box you bought had in it and had to scrounge around for more.


Method:

  • Bring cream to a simmer, just before a boil. Watch it closely as it could boil over quickly.
  • Break/cut chocolate into small chunks and place in a heat proof bowl.
  • Pour cream over chocolate and mix it all around. You’ll likely need to use a double boiler method to heat the whole thing up and melt it together.
  • Take off heat, add Grand Marnier, vanilla and flaky salt. Stir together and then pour into your pan and smooth it out. I only poured it into half the pan to make it thicker. I figured it would make for easier scooping. I don’t think it would have made a difference either way.
  • Refrigerate until firm, but not hard, about 30 minutes.
  • Drag a melon baller across the mixture and drop truffles onto a parchment/waxed/foil lined baking sheet. Note: I needed to use a spoon to get them out of the melon baller and my hands to roll them into a ball.
  • Pour some icing sugar into a dish or tray. Drop the truffles in and shake around to cover them in sugar.


Bean there, canned that

'Picy Beans! My ceasers await you all year long!

‘Picy Beans! My caesar’s await you all year long!

As the days have gotten ever so much cooler, I am panicking at the thought of fall. And not because of the impending winter … (Secretly… I kinda like the change in seasons and then there’s sledding! skating! drinking coffee while wrapped in a cozy quilt!). I am panicking, mostly,  at the thought of how many things I want to still preserve, and how short that window of opportunity now is. So last weekend, on our weekly trip to Leslieville Farmer’s Market,  we bought a big basket of green beans for the infamous ‘Picy Dilly Beans. Jim from Haystrom Farms was kind enough to let us pre-order it the week before, so it was waiting for us on arrival. Naturally, I had no time to do them until this weekend, but they kept really well in the fridge.

A sink full of beans

A sink full of beans

A few hours of washing, trimming, cutting, prepping, stuffing, and boiling later (whew!) and 7 beautiful jars of beans sat on the counter. These things are Ah-Mah-Zing in caesars (It’s their raison d’être, really). They’ll also do excellent double duty on a bread and cheese board, and, I imagine, quite well chopped up in tuna or chicken salad…. although, truthfully,  we’ve never really gone past the caesar stage!

Now… the original recipe that I’ve used in the past came from Canadian Living and calls for dill heads (those flowering seed “flowers” that dill grows late in the season). I bought some, I kept them in water, and I put a bag over them to prevent the seeds from scattering across the four corners of my apartment. What I didn’t do… is use them the next day, change the water, or even look at them for the better part of a week. So when I finally pulled them out last night… womp womp… they were all mouldy.

All that you'll need

All that you’ll need

What’s a girl to do? Why, use the dill seed in your spice cupboard, and maybe double up on the garlic to make them ‘Picy Garlicky Dilly Beans.

Lesson learned (not really…. I have a flat of tomatoes sitting on the kitchen table waiting for sorting).

On with the show. You’ll also need mustard seeds, hot red peppers (fresh or dried), the aformentioned dill seed (or the real deal), and garlic!

Gorgeous garlic! So fragrant!

Gorgeous garlic! So fragrant!

Look at this beautiful garlic from Healthy Choice Farms that I also picked up at the farmer’s market. I ❤ Ontario produce!

You know the stuff is fresh when it’s juicy and sticky as you peel it. I can’t wait to roast a couple of these babies up!

Brine supplies

Brine supplies: vinegar, water, and pickling salt.

Alright, once you gather all your ingredients, you’ll also need some vinegar and some pickling salt (which I already had from last year… courtesy of Bulk Barn). Easy peasy, you just combine water, vinegar, and pickling salt.

Trimming and cutting to size

Trimming and cutting to size


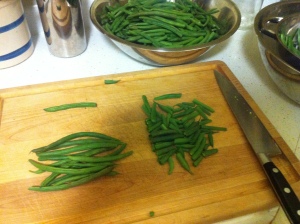
You’ll have already washed your beans, trimmed the stem end off, and cut them down to about 3.5 inches. I grabbed bunches, lined them up, and trimmed. (Keeping the trimmings to quickly steam and eat later… waste not, want not!)


You’ll notice my “Measurement Bean” at the top of the board in the photo above. I actually used a tape measure on it and then measured all the other beans against it. *shrugs*

Wash and sterilize your jars in the hot water canner – I did a hard boil for 10 minutes. Remove and then fill in with your fixings. Garlic, mustard seed, hot peppers, and your dill (of either variety). Then cram in the beans. For this I tipped the jar a bit sideways and tried to line up the beans like little soldiers to get as many in as I could.

Into the jars: garlic, mustard seed, hot pepper, dill seed

Into the jars: garlic, mustard seed, hot pepper, dill seed

Beans go in, as tight as you can

Beans go in, as firm as you can

After your brine has boiled , use a funnel to pour it over the beans. Then use a butter knife around the edge of the jars to release any trapped air bubbles and top up.

In goes the hot brine

In goes the hot brine

On go your lids and back into the canner. A 10 minute boil later…. you have beans!

‘Picy Garlicky Dilly Beans
Adapted from Canadian Living

I also doubled this recipe. I find that when I do that, I get one less jar’s worth of brine. This made 7 500 ml jars for me.

Leave them for about 6 weeks for the pickling to take effect.

Ingredients:

  • lb green beans
  • 4 small hot red peppers (fresh or dried)
  • 4 tsp dill seed (or 4 head of fresh dill)
  • 4 -8 cloves garlic (depending on your preference)
  • 4 tsp  mustard seeds
  • 2-1/2 cups  water
  • 2-1/2 cups  white vinegar
  • 2 tbsp pickling salt

Method:

  • Wash, trim and cut your beans down to 3.5 inches in length.
  • Wash and boil your canning jars to sterilize. Add hot water on your lids to soften them. (I learned to put them in water and simmer them gently, never boiling them)
  • Into each jar, add 1 tsp mustard seeds, 1 tsp dill seed (or one head of fresh dill), 1 hot pepper, and 1-2 garlic cloves. Pack the beans in so they’re tight.
  • Combine your water, vinegar, and pickling salt. Bring to a boil and simmer 3 minutes.
  • Pour into your jars, leaving 1/2 inch of headspace. Insert a knife/spatula/chopstick/thin long object along the inside of the jar to remove any air bubbles. Wipe off the rim of the jar, add a lid and put the ring on, making it tight but not excessively so (fingertip tight, they call it)
  • Put jars into canner, making sure tops are covered with water, bring to a boil, and process the jars for 10 min.
  • Lift out of canner, trying not to tip them, or touch the lids/bands. Let cool.
  • You should hear satisfying pops as the lids seal. When they’re cool, any that have not sealed should go in your fridge, and the rest are good for up to a year in your pantry. Leave for 6 weeks to pickle the beans.


We be jammin’

It’s time to can! After a delightful 2 weeks off work (camping! cottaging! fresh air! mid-morning drinks!) it was lovely to come home and have a few extra days to get settled and organized before starting a new week and month. Yikes, where did you come from September?! 

If you know me, one way for me to feel that all is right with the world is with a trip to the farmer’s market. I love farmer’s markets! So Sunday morning off we went to Leslieville Farmer’s Market where an abundance of goodies awaited us. With Ontario produce at peak season right now, it was hard to be restrained!

Plums for everyone

    Plums for everyone – also apples (it really is fall!)

farmer's market bounty

Gorgeous farmer’s market bounty

Luckily a BBQ that evening took the 6 ears of corn off my hands, and this super easy and exceptionally delicious plum jam helped as well. (Let’s be honest. I bought enough plums to make jam AND to eat all week.)

I stumbled on the recipe very randomly last year over at Food in Jars and was so happy with it, I couldn’t wait to recreate it again. The spicing may sound surprising, but you’ll be clamoring to make it again and again. In fact, I may buy some more plums just to have another go at it.

Ready to cut

Washed and ready to be chopped

plum jam ingredients: star anise, sugar, plums

All you need: star anise, sugar, plums

 This jam is super easy to make. You just need to chop up some Italian plums, add sugar and star anise, and let it sit for an hour or more until it gets all juicy. Then bring to a boil and cook for 15 min until the jam thickens up and the fruit falls apart a bit. All done! You can put it in jars for the fridge, or you might want to can it for the cold winter ahead. Especially delicious on toasts with a bit of salty cheese, or prosciutto. 

mixed and ready to sit

All mixed and ready to sit and chill out

gorgeous plum jam

Such a gorgeous colour –  all cooked up


Spiced Plum Jam via Food in Jars
I doubled the recipe and it made me two 250 ml jars and two 125 ml jars.

Ingredients:

5 cups chopped Italian Plums
1 1/3 cups sugar
6-8 star anise*


Method:

Chop your plums. I ripped each in half, removed the pit, and then chopped each half into 6-8 little pieces. 

Add your sugar and star anise. Mix. Leave it to sit and get all juicy (at least an hour. If you lose track of time, it’ll be just fine for longer)

Bring to a boil and cook on high for about 15 min. Stir a lot (you don’t want it to stick to the bottom of the pan or burn in any way). You do want your fruit to break down a bit and the juices to thicken. It will also go from yellowy to an absolutely gorgeous…. well, plum… colour.  

That’s it. Can it, or fill your jars and bowls. Perhaps the bowl had some ice cream in it already?

Happy jammin’!

*Really averse to star anise? Add some vanilla! or Amaretto! or perhaps an herb?! These plums are so yummy, they’re really the star of the show. I’m thinking of switching it up for the next round!


A simple Saturday

What better way to welcome Spring than a long walk? Until several months ago, I always thought a hike entailed driving out of the city. Then I discovered Tommy Thompson Park (http://www.tommythompsonpark.ca). If you’ve never gone, I urge you to do so. If you only have a few hours to spare, it’s perfect.

Image(photo taken during a previous visit. snow is gone!)

There is a lighthouse at the end (gated off) and a round trip might take you about 2- 3 hours depending on how long you pause and how quickly you walk. We saw tons of joggers and bikers as well. Free parking right at the start, but gates close at 4:30 (so I read…. haven’t stayed to find out!) The first part of the park is still used to dispose of excess fill from construction sites so you’ll see a lot of iron rods by the rocks near the water. Keep on walking and you’ll hit the natural habitat and, save for the planes flying overhead, you won’t think you’re in the city!

Image

Once you hit the end of the spit, you’ll be rewarded with some pretty interesting art…. Image(This is a sundial, or so the rock sign told us)

Overall, a nice way to break up the day and get out and enjoy some fresh air without having to trek out to the trails!

Image